3.29.2011

lasagna

I have random cravings for lasagna all the time. I've been meaning to make it for some time, but just never got around to it. So you know how I had pizza before, I had the pizza sauce leftover, cheese leftover, and other leftovers. Do you think that they're practically the same ingredients?!

Okay, so I didn't follow a recipe exactly...but it's all right. It turned out great. No step by step pictures this time, but yes. So inside this lasagna are the same ingredients as the pizza. There was mushroom, onions, and sausage. I added spinach as well, for some green in our food.

Ingredients:
1 box of dried lasagna (fresh is good too) - cook according to instructions
1 pound sweet Italian sausage - remove casings and roughly chop (can use any kind of meat you like, even ground meat)
1/2 cup chopped onions
1 handful of sliced mushrooms
1 can cooked spinach (I wouldn't recommend using this, fresh is better or even frozen)
1 32 ounce jar of ricotta cheese
1 egg
1/2 jar of pizza sauce
1 can tomato sauce
1/2 bag of gruyere and swiss cheese

*note: you can use more or less cheese, different kind of cheese (usually mozzarella and parmesan, i just had gruyere and swiss on hand), same as the meat and other good stuff, all according to your taste.

Directions:
Cook lasagna based on the box instructions. There are some pasta that you don't need to cook before, so check.

Meanwhile, saute the sausage, mushroom, onion together until cook through. Add the rest of pizza sauce and can of tomato sauce into the mixture. Add water into the empty jar and add the water into the mixture. Simmer the meat and tomato mixture and turn off heat. Leave to side.

Mix ricotta, egg, and spinach together. Make sure all the liquid from the spinach is squeezed out. Add half of the cheese into the mixture. You can leave the cheese out and layer the cheese on the layers, rather than mixing it with the ricotta.

Now assemble! In a 9x13 baking dish, ladle a little of the meat and tomato mixture so that it covers the bottom of the pan. Layer pasta on top, it's okay to overlap. Spread half of the ricotta mixture on top of the pasta. Ladle meat and tomato mixture on top. Layer pasta on top. And continue the layering until there's none. The very last layer should be pasta, then rest of the sauce. On top of this, sprinkle your remaining cheese.

Preheat oven to 350. Cover the lasagna with foil and bake for 30 minutes. Take the foil off after 30 minutes, and put back in oven and bake for another 20 minutes (or keep an eye on it until the cheese is nice and browned)

Sounds complicated, but it's easy!

3.28.2011

Maple Caramel Bacon Brownies with "Bacon Chips"


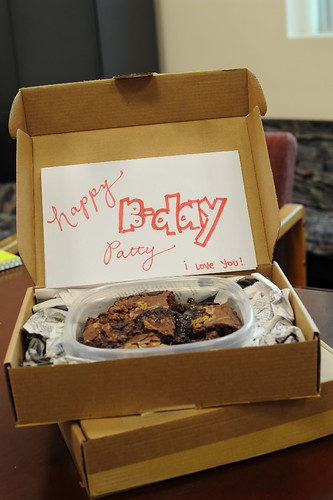
I love snail mail, and I'm not talking about my latest buy or the new J.Crew catalogue (though I look forward to both of those as well). I'm talking about lovely hand-written notes, holiday cards with cute animals, and best of all, homemade treats. Whether I'm sending or receiving, I get a giddy, fuzzy feeling inside. It is so easy to make someone far away feel loved and love on them through the mail, so with my sister's birthday coming up, I knew I wanted to send her a piece of love.

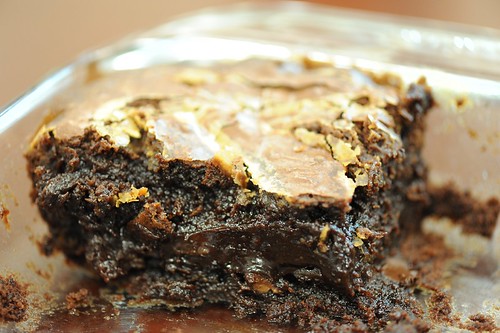
Growing up, Patty liked nothing more than chocolate. Brownies, cake, whatever it was, wherever we were, my family ordered it as long as it had luscious, melty chocolate. I bet by now, she is a certified chocolate connoisseur on the level of, dare I say it, Jacques Torres! Gasp! (Haha, actually, I just play. I don't think that's even possible.) In any case, I decided on brownies, but not just simple-but-still-awesomely-delicious-box brownies, I wanted something decadent with different textures and surprising notes that was simultaneously sweet, salty and chocolate-y. So I got really bold: bacon-maple caramel brownies with "bacon chips." A few days late, but Happy Birthday Patty! I love you!


The result was not at all expected, but still delicious. The taste was phenomenal. Think deep, rich chocolate enveloping bits of sweet and salty bacon. If I were to do it again, I think I'd make a few adjustments to have a better texture. In particular, I'd make sure my caramel set rather than sort of just seep throughout the brownie which (while good) made my brownie a little bit more fudgie than I would've liked.


Bacon-Maple Caramel Brownies with "Bacon Chips"
Inspired by Kate, but significantly edited.

Bacon-Maple Caramel and Bacon Chips
  • 6 pieces of bacon
  • 3/4 cup heavy cream
  • 1/2 cup sugar
  • 1/2 cup packed brown sugar (preferably light)
  • 1/2 cup maple syrup (preferably 100% maple syrup, not pancake syrup)
  • 6 tblsp butter
  • 1/4 teaspoon salt
Fry bacon according to package instructions in a large sauce pan making sure to keep the remaining bacon grease in the pan. Once bacon is fried crispy, remove from pan, crumble into small pieces and set aside. Pour heavy cream into into the bacon grease, stir and let cool ten minutes to incorporate flavors.

Once slightly cooled, in the same pot, combine heavy cream and bacon grease mixture with 1/2 the crumbled bacon, sugar, brown sugar, salt, maple syrup and butter. Put on medium heat until butter and sugar have melted stirring constantly and bring mixture to a boil. Once boiling, lower heat to a gentle simmer and watch your pot very carefully until it turns into a deep nutty brown. (As with all caramels, be careful to watch it carefully so that it does not burn and ruin your pot along with it.) Once it reaches your preferred depth of flavor, remove from heat and let it cool completely. Make sure you allow the caramel to cool completely, or it will not set right in the brownies.

Brownies
* Box or home made, you can go with whatever your favorite brownie recipe is. I used this one, but basically, once you batter is made carefully stir in the remainder of your bacon crumbles to give your brownies an extra brownie bite.

Assembly
To assemble, grease a 9x13 or 9x11 pan and heat oven to suggested temperature for whatever brownie recipe you chose.

Pour half the brownie batter into the bottom of the pan. Then add glops of your cooled caramel on top of the brownie batter. The caramel does not need to create a solid layer, rather it should be grouped so that patches of caramel are spread over the tops of your brownies. Then pour the remainder of your brownie batter on top. Then pour the reminder of your caramel in horizontal parallel lines over the top layer of your brownies. Use a knife to draw vertical parallel lines to create a cute pattern for the tops.

Bake in the oven for suggested amount of time according to your brownie recipe or until an inserted toothpick comes out clean. Let cool completely before cutting and serving.

Enjoy!

3.24.2011

homemade pizza

I heart pizza. I am always in the mood to eat pizza. One night, jwoo decided that he wanted to make pizza. At Trader Joe's, they have fresh pizza dough in the refrigerated section, and I was always curious how it tasted and worked. I am used to using the Pillsbury kind, which is totally fine. But alas, the chance came to try it! I'd say our pizza was definitely Trader Joe-d out. :]
This was their pizza dough. They ran out of the normal kind so this is the whole wheat. I used a mixture of corn meal and flour to help it not stick. You need to allow the dough to rest outside of the package for 15 minutes or something.
These were our ingredients. Trader Joe's everything: sausage, pizza sauce, mushroom, cheese. For our sausage we had a mixture of the Sweet Italian pork and chicken sausage (Personally the pork tastes better, but I'm a fatty). There's no real recipe that I followed, it was kinda just winging it and according to your taste, but I will try my best have a logical and methodical way...
So this is all the onions, sausage, and mushroom (and garlic but you can't see it) that was chopped up. You can adjust the amount of stuff you want, depending on how meaty or oniony or mushroomy you like. I think I used 3 sausages, a hand full of mushrooms, a little less than half an onion, and 2-3 cloves of garlic.
Saute all that goodness together with a drizzle of olive oil, not too much because the sausage has fat in it. Cook until all are browned. Set aside.
Roll out the dough. Actually, we kinda just pushed it out very gently and tried to make it as even as possible. Since I didn't have a pizza stone, we made it rectangular which has a nice look to it, right?
We spread the canned pizza sauce on. I used about half a jar of it. Spread it so that it covers most of the pizza except about an inch from the border. Depending on how sauce-y you like your pizzas, you can put more.
Cover the pizza with the toppings that were set aside.
Sprinkle cheese on the pizza covering most of the pizza. I used a mix of Swiss and Gruyere because I like it, but you can use mostly any cheese that you like.
Your oven should be at 400°F. After preheated, put your pizza in for about 20 minutes. Keep an eye on it. When the cheese is nicely melted and the edges are browned, take the pizza out of the oven. I'd say, wait for it to cool a little, but I couldn't resist.
Mmmm, so yummy and easy! The whole wheat pizza dough made it seem healthier and is pretty good, though I still prefer normal pizza dough. Next time, I'd probably put more toppings, but this was very satisfying.
You can make pizza any way you like it, barbecue pizza, with chicken, bell peppers, anything! Even anything you have on hand, it'll be delicious.

3.22.2011

muracci's japanese curry & grill

Have you had Japanese curry before? It's delicious and really simple to make, because all the spices come prepackaged in a box! However, when Jess (J on this blog!) told us about this place that makes curry from scratch in the city (SF), we knew we had to try.


We went to visit Harmonious for lunch one day and on Jess's recommendation, we ate at Muracci's. This hole in the wall is unassuming, one in a whole street of restaurants catering to the employees in the bustling SF financial district.

It was so crowded. I was prepared (thanks Yelp!), so N ran to claim one of the few tables in the place. I think it seats maybe 10 people overall? We shared a mild chicken katsu (deep fried chicken cutlet) curry.
The curry comes separately in a plastic container, so as to not render the fried katsu soggy.

Ta-da! The cutlets were fried perfectly, with thick cuts of chicken and good amount of breading.

The star is definitely the curry. Their menu boasts, simmered for two days straight with vegetables and spices. And it certainly tastes that way! The spices kind of creep up on you and build in your mouth with each bite. If you've never had curry made from scratch, you definitely should. I don't know if I can go back to boxed curry as delicious as it is.

N went back with J Woo and they got chicken kara-age, which she'll tell you all about!

This is their chicken kara-age. This was really good, though I thought the chicken was a bit over fried, but still very yummy. The lunch set comes with miso soup, potato salad, and salad, so it was very filling and good.
Murracci's Japanese Curry & Grill
San Francisco, Financial District
307 Kearny Street CA 94108-3204

My Love Affair with Jam

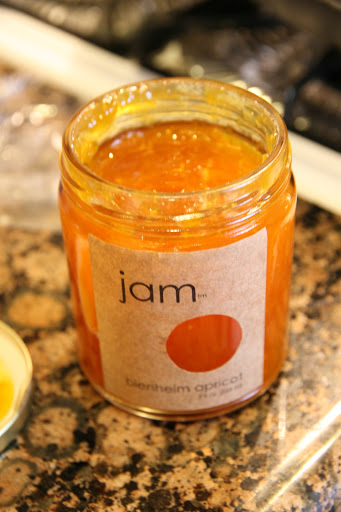
I have a confession. I love Jam. Granted, this is a new found love, but all I've had on my mind for the past few days is Jam. Eating jam, researching jam, making jam, tasting new jam, thinking a wonderful flavor combinations for different jams, wondering how many different ways I could eat jam. And it is all because of this simple little jar of blenheim apricot jam from We Love Jam:

Up until last weekend, I've never bought any kind of jam other than Smucker's strawberry. It's relatively cheap and the stuff I grew up on; why would I ever need anything else? And why would I ever want to spend more than $4 on a jar of jam?

Three words: Dorie Greenspan's Jammers (but that's a post for another day).

In any case, We Love Jam's blenheim apricot jam is simply sublime. It has the most intense, perfectly sweet apricot flavor without any artificial flavors, a silky smooth texture, and is perfect for just about anything - toast, cookies, croissants, crackers, and pretty much anything you'd ever want to put jam on. From the first moment I tasted it, I was totally and completely in love and I wanted to eat it by the spoonful. This jam is so undeniably superior to any other store bought jam I've ever had, I cannot imagine ever going back to that other stuff. And now, I am quivering in anticipation just hoping that I will also get to taste their mariposa plum and feijoa sometime soon. My heart is already melting. :D

Do you have any favorite jams? Are there any other ones I should try and fall in love with as well?

3.10.2011

sumiya part 2

When D saw my last post, he demanded to see the other pictures.

"What other pictures?"

"You know...from the other time we went!"

He then proceeded to email me said pictures.

I'm glad he did, because this time, we didn't just do meat dishes.


Exhibit #1: Bacon wrapped mushrooms

This... yeah. I'm speechless. The bacon was perfectly crisp and had a wonderful smokey, salty flavor that blended really well with the chewy, soft mushroom. A must get. Seriously.

Exhibit #2: Hamachi

This was grilled yellowtail. It was good too, and the negi (green onions) and masago (salmon roe) were a nice touch.

Exhibit #3: Nasu (eggplant)

I loved this too. Eggplant, a lot of times, absorbs too much of the oil that it's cooked in, but this was perfect. Soft and delicate, it melted in your mouth without the heaviness of oil. It was topped with bonito and a light soy sauce. Yum!

And now, the obligatory meat dishes:


I don't remember what the first one was...though I'm sure it was very good. The darker meat is kalbi (beef short rib) and the back skewer was chicken with ume (plum) sauce. I didn't like the flavor of the ume very much, but I'm sure for those who do, it would've been delicious.

Verdict? If you're not salivating by now, I don't know what kind of food you eat. But please consider bringing me along.

3.08.2011

sumiya yakitori

I love Japanese food. It always feels so clean and fresh and best of all, delicious! Even when you eat something like yakitori, or (loosely) grilled skewers, it never feels heavy at all.

D took me to this place in Santa Clara called Sumiya, a restaurant that specializes in yakitori. The restaurant itself is quite small, and very popular. We managed to get 7pm reservations (I don't know how that happened, but I'm glad it did!), and we were pretty much right next to the diners adjacent to us on both sides.


I've had yakitori before, but not as a full blown meal, so D did most of the ordering. We ordered pork belly, chicken with yuzu sauce, and a yakitori donburi. (A donburi is, loosely, a rice bowl.)


Both meats were tender and well seasoned. The pork belly can be a bit much for people because it's so fatty, and I have to say, I was glad it was the only "fatty" thing we got. I'm not sure if I could've handled more, as delicious as it was. It's how I feel about bacon. Delicious, but can be much. The sauce on the chicken was unexpected; I'm not sure if I liked it, but it was good.

The highlight was definitely the donburi. It came with a wonderful, chilled poached egg that lended a creaminess to the skewers and rice... I'm salivating just thinking about it! So, so good. Eggs are amazing.

We finished off the meal with a dessert--green tea creme brulee. Yes, more eggs. I love custard, and this was light and creamy with a hint of bitterness from the green tea. It was gone in seconds.


Isn't the raspberry on the side so cute?

If you're in the South Bay, definitely check it out--but get reservations early! It's almost impossible to walk in. Also, it can get pricey! Skewers range from $3 to $12 dollars depending on what and how many you get. There's a wide variety of food, from vegetables, to meat, to seafood. They're all really, really good, so if you want to try them all, bring lots of money!

Sumiya Yakitori
2634 Homestead Rd
Santa Clara, California
http://www.sumiyakitori.com/

3.05.2011

Challenge Accepted: Cornbread Broccoli Surprise!


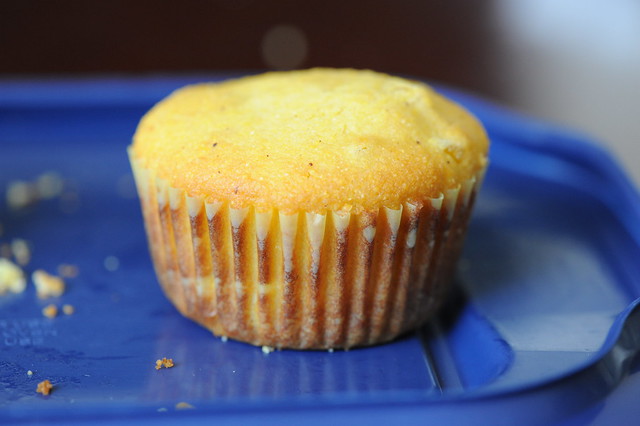
This looks like your everyday corn muffin, right? You can even see the little bits of corn poking out at you. Aren't they cute?

But aha! That is where I have tricked you! First of all, this is no ordinary corn muffin. It is the most delicious, perfect corn muffin I've ever had. And second, inside each of these already glorious corn muffin gems, is a giant piece of broccoli waiting to give you the extra nutrients you need, or at least give me the chance to win a little friendly competition. And they look awesome - like little trees surrounded by the sun.


It all started with a friendly little evite for small group. The challenge? Cook something with broccoli, and the winner will have their first pick of any favor offered by the group. Now, I have some formidable cooks in my small group, so I knew I would have to go all out to win.

After a lot of thinking, I finally decided on making some sort of dessert, but what could possibly make broccoli taste like a dessert. It's not like you can just dip it in chocolate and call it a day. Then, like a beacon of hope, I found my inspiration: corn bread - savory enough to still match with broccoli, but able to be made sweet enough to still be dessert-like. Perfect!

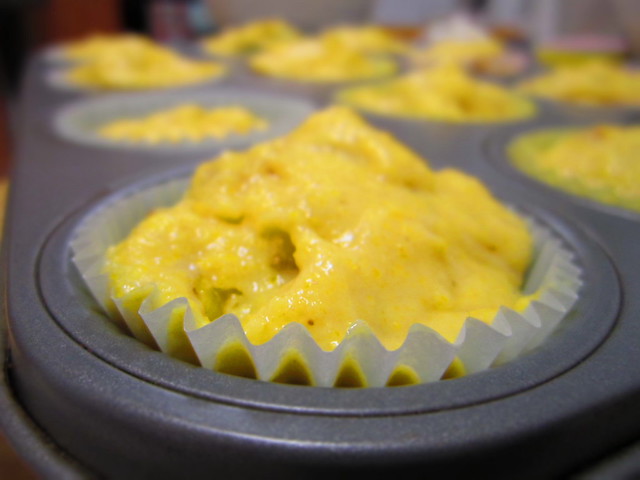
Assembly is so easy! Put a little corn muffin batter at the bottom, and place a broccoli stalk upright in the middle.
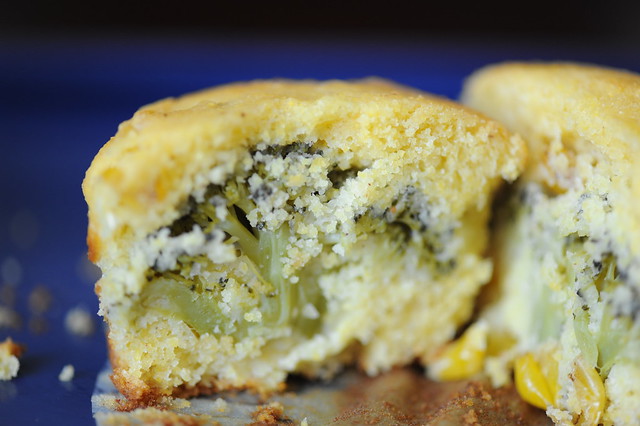
Pour corn bread batter over your broccoli so that it completely hides any sign of the broccoli. Then, bake.

With or without the broccoli, these corn muffins are delicious. They are just the right touch of crumbly, while still moist and the addition of corn adds a great extra texture. It can be easily adjusted to be either sweet or savory. Personally, I also thought the broccoli was a nice addition. I boiled it in honey water so the stalks would be soft and the broccoli itself would complement the sweetness of the corn muffin. I hope you enjoy!
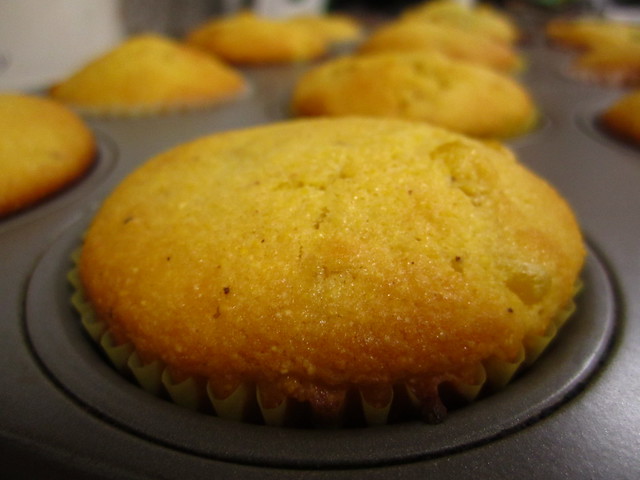

Cornbread Broccoli Surprise!
Adapted from Dorie Greenspan's "Corniest Corn Muffins" - Baking from my Home to Yours

Makes 12 cornbread muffins
  • 12 Small bunches of broccoli
  • 1/2 cup honey
  • 1 cup all-purpose flour
  • 1 cup yellow cornmeal
  • 6 tbls sugar
  • 2 1/2 teaspoons baking powder
  • 1/4 teaspoon baking soda
  • 1/2 teaspoon salt
  • 1 cup buttermilk
  • 3 tbls melted, browned butter
  • 3 tbls oil
  • 1 egg
  • 1 egg yolk
  • 1 cup corn kernels - I'd use fresh... otherwise, maybe don't even bother.
Bring 2 cups of water and 1/4 cup of honey to a boil. Dump in your broccoli and boil until tender and broccoli takes on a hint of honey, about 6 minutes. Once done, thoroughly pat dry so that the broccoli is not moist and put aside.

Preheat oven to 400°F, and place rack in the middle of oven. Prepare muffin tins with either paper muffin cups or by greasing the pan.

In a large mixing bowl, mix together the flour, cornmeal, sugar, baking powder, baking soda and salt. Then, in a pyrex measuring cup (PS: I really love pyrex! So simple, versatile and easy to use!) or something that is easy to pour out of, whisk together the buttermilk, browned butter, oil, egg, egg yolk, and remaining 1/4 cup of honey until well combined. Once mixed, pour the liquids into the dry ingredients while simultaneously stirring. Stir quickly, until just combined; the batter will be lumpy and relatively thick. (Be careful not to over mix your wet and dry ingredients as the corn muffins will become very tough and dry if stirred too much.) Finally, gently fold in your corn kernels.

To assemble, scoop a large spoonful of batter into the bottoms of each of your muffin cups so that batter fills about 1/4 of an inch of the muffin cup. Then, firmly place a broccoli stalk upright into each of the muffin cups. The broccoli should stand on its own without leaning toward a side of the muffin cup. Pour the rest of the batter over the broccoli so that each stalk is completely covered. Be careful to make sure that the batter completely surrounds the broccoli on all sides (including under the crown of the broccoli) so that your muffins bake in full rather than just tops and bottoms. (PS: Your muffins will likely look lumpy or messy before they are baked, but I assure they bake beautifully smooth and fluffy.)

Bake for for 15 - 18 minutes or until tops of muffins are golden and an inserted toothpick comes out clean. Cool muffins for at least five minutes before removing from molds.

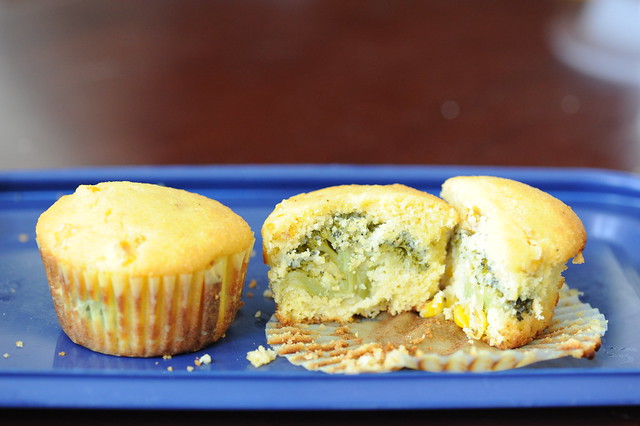
Cut in half to reveal the surprise, serve warm with honey butter, and enjoy!

Thanks Thomas for some of the photos. :D

3.03.2011

burma superstar

For jwoo's birthday, me, m, j, jen and peter took him to burma superstar. It was all our first times except for m's. Maybe m and j can add to this review... So we ordered 6 dishes and it was pretty good. Not sure if it's my type of food in terms of spices and all, but pretty good.
Samusa Soup. This was yummy, but I wasn't really sure what I was eating and drinking. Hahaha.
Tea leaf salad. This is the thing that they are famous for and everyone raves about it. I thought it was alright. I liked the nuttyness and that you can actually see the components that you were eating. I also liked how they mix it in front of you. It made me think they were cooler.
Rainbow salad. I liked this salad better, based on taste and I don't know...but yes, more fresh tasting rather than heavy on tea leaves.
Pork curry with potatoes. This was good. I can't really remember actually...the pork was soft and potatoes cooked through...
Salmon curry with pumpkin. This was okay too. I liked the pumpkin in it.
Beef kebat. This was my favorite. It was just enough spicy and cooked really well.

I'd say, it's a good experience, but I don't think this is something that I crave and think about going to and eating at. Worth going to though just to try.

Burma Superstar
4721 Telegraph Ave
(between 47th St & 48th St)
Oakland, CA 94609
(510) 652-2900

cream puffs

Cream puffs. I really like these and actually, they're kinda scary to make. But before I talk about that, let me introduce you to something...
Meet my first cookbook. Is it beautiful?! It's from Jess for my graduation present. I'm really excited to bake from this book, and this is my first!
Profiteroles is just the fancier way of saying cream puff. Maybe there's a difference, but to me, it's all the same. So I followed the recipe for the puff itself, but did not use the filling or the sauce.
After making the batter on top of the stove, I piped out about 1-inch mounds of dough. With a moistened fingers, I smoothed the tops. Then I baked them!
After they finished baking, I had to slit a hole into each of them and put it back into the oven, with the oven off and the door open, so the puffs would remain puffed and not deflate.
Cooled and ready to be filled! I made my custard which is the same recipe I use for fruit tarts! Very easy.
That's the tip I used, it's just so much easier and made it so that I didn't have to cut the puff in half to fill it.
A neat trick to fill the pastry bag is to put it in a cup and fold the sides of the pastry bag down. Then fill the pastry bag with your filling and that's it! So easy and makes your hands free.
Pipe it through the hole you punctured in it earlier. And there you have it, your cream puff!
Cream puff recipe (I halved the recipe and made about 26 cream puffs):
makes 4 dozen

Ingredients:
1 cup water
1/2 cup unsalted butter (1 stick)
1 cup unbleached all purpose flour
1/4 tsp salt
4 eggs

Directions:
Bring 1 cup water and 1 stick butter to boil in a medium saucepan over medium-high heat, stirring until butter is melted. Turn heat to low, add flour and salt all at once. Stir vigorously until mixture is smooth and dough pulls away from the edges and forms a ball, and leaves a thin film on pan bottom (about 2 minutes). Transfer to large bowl. Using a handheld mixer (I did it by hand! My workout), add eggs one at a time, blending well after each addition. Cover dough loosely with plastic wrap. Let dough stand and cool for about an hour.

Preheat over to 425°F. Lightly butter (I used parchment paper) 2 large rimmed baking sheets. Spoon dough into pastry bag fitted with 1/2 inch plain tip. Pipe 1-inch rounds on prepared baking sheets, spacing 2 inches apart (mine was more like 1-inch). Using moistened fingertips, smooth tops.

Bake puffs until golden brown and puffed, about 23 minutes. Remove from oven and turn off the heat. Pierce side of each puff with tip of small knife. Return the puffs to hot oven; let stand for 10 minutes with door ajar. Remove from oven and cool completely.

*Can be made one day ahead. Store in airtight container.

Pastry cream - kind of like a vanilla custard :]
You can find the recipe here at the fruit tart post. I halved this as well, but ran out of filling, so maybe be less generous or make the entire amount and be more generous (I'd go for the latter option).

Fill the pastry cream into pastry bag with 1/4 inch plain tip (I used star, I don't think it matters). Insert tip into cut on each puff and pipe in filling.

*Can be made 8 hours in advance. Cover loosely with plastic wrap and refrigerate.