7.18.2011

Jalapeno Cheddar Scones

Sometimes, inspiration is the best when it comes from people you love (because then they have to bake with you!) Like in the following conversation with my roomie.

Me: I do not know what to make for Café night.

RM: Scones! They are perfect for tea and coffee!

Me: OOHH! Savory scones! With Cheese!

And this, my friends, was literally the conversation that led to these marvelous, fluffy, glorious scones. I honestly don’t think the pictures do them justice. The texture is just a little bit doughy – more biscuit than scone – and the jalapeno adds a wonderful, subtle bite of spice to the scone. But the cheese by far steals the show. When they’re fresh out of the oven, the cheese is still warm and melty, and the bottom forms a lovely cheese crust in the pockets where the cheese has oozed out. AHH. It will make you swoon. These are great by themselves, with soup, or even with a little (dare I say it) blenheim apricot jam from We Love Jam! I’ve eaten them every which way imaginable, and these babies do not disappoint.

Go on, give them a try! Of note: scones are best served the day they are baked. The second and third days never taste as good. Trust me; I didn’t believe the scores of bloggers across the internet that said the same thing, and then I was left with slightly stale scones. Not Fun. I chose to flash freeze most of mine. This way, when you want one, just pop it into the toaster oven (still frozen) and bake. And voila! Freshly baked scones! Enjoy!

Jalapeno Cheddar Scones -- Inspired by Smitten Kitchen

2 cups all-purpose flour
1 tablespoon baking powder
1 teaspoon salt
8 tablespoons (1 stick or 4 ounces) cold butter, diced
1/2 cup heavy cream
3 eggs, divided
1/4 pound sharp Cheddar cheese, diced
2 small jalapeños pepper, minced (I wimped out and used only one only to find my scones entirely heat-free)

Preheat oven to 400°F. In a small skillet, melt 1/2 tablespoon of butter and sauté the jalapeños in it until soft, about two minutes. Let them cool, then place them in a small bowl with the cheddar cheese and coat them with one tablespoon of the flour. Combine the remaining flour with the baking powder and salt. Cut in the remaining butter with a pastry blender, fork or two knives, until the butter bits are pea sized.

Lightly whip two of the eggs and cream and add to the flour-butter mixture. Using a wooden spoon, fold mixture until it begins to come together. Add the cheddar-jalapeño mixture to the dough and mix until everything is incorporated.

Turn out the dough onto a well-floured surface and knead gently for less than one minute. Pat dough out to a 3/4- to 1-inch thickness and either cut into 8 triangles or the shape of your choice with a biscuit cutter. Make an egg wash by beating the remaining egg with a teaspoon of water. Brush the scones with egg wash and place on a parchment-lined (or well-oiled) baking sheet. Bake for 25 minutes or until golden brown.

6.23.2011

goin' to the zoo...zoo...zoo

I mean, aquarium. Monterey Bay Aquarium, that is! That was the first part of my birthday actually. There we sampled a delicious clam chowder and oyster po'boy.


Yum! After meandering through the aquarium, we explored the surrounding area for a bit and found a piece of our childhood.


Dippin' Dots!

6.21.2011

la bicyclette

We're still alive, I promise! This post, is long overdue, but then again, what posts of mine aren't? My birthday this past April was particularly filled with culninary goodness, and this little gem in Carmel, CA, was no exception.

Named La Bicyclette, this French restaurant was tucked away on a side street. It didn't look like much on the outside, but we (D and I) were instantly charmed by the atmosphere once we stepped inside.


It was like stepping into a little French town (not that I know what that's like). The smells of bread and other foods were incredible. The waitresses were dressed in nautical stripes and skinny black ankle pants (I suppose it's J. Crew's version of French). One such waitress apologized that our table wasn't ready and offered us some wine as we waited. D told her what he wanted--of course, I had no idea what he said, or what wine would be good, so I dumbly nodded that I wanted the same. When we finally sat, I made D take a picture of this miniature bicycle next to us.


La Bicyclette offers a prix fixe of sorts--the meal comes with a set first and second course, and you get to choose the third. They also have breads and pizzas a la carte, which seemed to be popular with the locals. A dessert menu is also available.


The first course was a lovely terrine. At first we weren't sure what it was, to be honest--some kind of paste? But it had a wonderful creamy, cheesy texture that went so well with the lightly toasted bread. Very herb-y and light.


The second course was a soup. They served it to us in a copper kettle pot, which I thought was so charming. It was a curried soup, with really deep, rich flavors. I wanted to drink it all, but I also wanted to save room for my actual entree.


For our entrees, I got the filet mignon and D got the lamb. I don't think I need to describe the wonders of beautifully cooked meat.


Afterward, D told one of the faux Parisian waitresses that it was my birthday and they gave us dessert with a candle on it! A nice gesture on their part, and a very delicious panna cotta.


It was a wonderful birthday dinner. I couldn't have asked for more.

5.31.2011

chocolate covered orange peel

My mom really likes these. Not just oranges...but chocolate covered oranges. Everywhere we go, if she sees the chocolate covered orange peels, she'll want to buy it, except that it's supersuper expensive for some orange peels (which people throw away) and chocolate! Ridiculousness. Though I'm sure theirs tastes super delicious and yummy...but how hard can they be?

I decided to make them for my mom when she came to visit me and m. It's not hard at all, just time consuming. You have the cut the peel first, then boil it in water. Not just once, but three times!
I peeled three oranges...it was a lot...
I think this is to boil away the bitterness of the pith, if there's much left. Then create the sugar and water mixture and boil the peels in that until they are translucent. This took me around 45 minutes. Then you have to let them dry for as long as you can.
I think I could've done a better job at leaving the excess sugar off...
I dried them for 2 days. They kinda don't look right...but it was alright :]

Then dipping the peel into chocolate, what a pain. I think I'm not very good at it, or just didn't find a good way of doing it. Use good chocolate, I think it makes a difference.
But they turned out good!
Here's the recipe:

Candied Orange (Citrus) Peel
adapted from userealbutter

4 oranges, peel of (or any thick skinned orange)
3 cups sugar
1 cup water

1 cup sugar for rolling
or
8 oz chocolate for dipping

You can harvest the peel in many ways. Here are two I recommend: 1) Cut the oranges in half and juice them. Cut each half in half again and take a spoon to scrape the pulp out, leaving a clean pith. 2) Lop off the top and bottom of each orange (think of removing the polar caps where the stem and opposite end are) just to the fruit. Score the orange peel like lines of longitude every 60 degrees. Peel the orange and clean the inside of the peel with a spoon.

Cut peel into 1/4 inch strips. Place peels in a large saucepan and cover with cold water. Heat on high until water comes to a boil. Pour off the water. Repeat twice more. Combine sugar and water in the saucepan and bring to boil over high heat until temperature reaches 230F. Add peel and reduce heat to simmer. Simmer until peels are translucent (30 minutes or longer). Remove peels from syrup and roll in sugar if desired, and set on rack to dry for 4-5 hours. Once the peel is dry, you can dip in tempered dark chocolate – shake off excess, and place on foil, wax paper, or baking sheet to dry. Store in a tupperware, or if not chocolate dipped, store in sugar or as is.

5.23.2011

best birthday/graduation everrrrrr

Nothing needs to be said, written, or anything. Just look at it. It's beautiful.
Even the color is so perfect and nice... :] Can you tell I'm really happy?! Because I am and I'm super super lucky. Thank you m and mommy and daddy. You guys know me well.
Thanks to Jen and Peter for mixes to bake delicious goodies...
But wait?! MORE PRESENTS?!
ICE CREAM MAKER!! Thank you jwoo.

Only downside is that I feel PRESSURED to make something super amazingly dericious. WHAT TO MAKE?! Suggestions?

Anyways, I'm so lucky and blessed to have family and friends who love me. Thank you for making my graduation and my birthday (which isn't even here yet) super amazing and special!

:]

5.09.2011

red velvet cupcakes!

Red velvet cupcakes are yummy. I can't remember when I made this but I'm pretty sure it was Valentine's Day. Very fitting right?
So actually, I didn't have enough food coloring, but it still looks red-ish right?
I made mini cupcakes because they're so much cuter!
They looked so good...but then...
I don't why they deflated so much!! But it's okay because that's what frosting is for!
This is a cream cheese frosting, which of course is very delicious. I had a piping bag. I used a normal circle tip. I tried to do a swirl with the icing, but it looked kinda ugly, so I just kept the tip in the center and piped and it looked like that! It looked so much better!
I messed up and so I decorated it and can you guess what it is? Hahaha
Decorated with sprinkles!

I lookedt a a lot of recipes and I basically adapted from this recipe, from my baking addiction. I'm too lazy to write the recipe, so just looked here! Enjoy!

5.01.2011

more s'mores madness!

I went through a s'mores craze. All I wanted to eat was s'mores and I wanted to make things with a s'mores theme. Needless to say, I'm over it and I'm satisfied.

There are always those days that you want s'mores, except you're not outdoors camping so it'll never be the same! SO what do you do?
Yeppp, we improvised. That is our indoor campfire. Actually its pretty dangerous so use with caution!
Just like any ordinary s'mores, we have our graham cracker, chocolate, and our perfectly heated and toasted marshmallow.
Mush it together and voila! You have s'mores. :] Yummm
So with leftover marshmallows, chocolate and graham crackers...I had to make something else! I love love, absolutely love rice krispies. So I thought, we not make s'mores rice krispies.
Very simply, I made rice krispies as I normally would but I made a graham cracker crust by crushing the graham crackers and a little bit of melted butter. So it kinda didn't turn out as well, but still pretty good. The graham cracker didn't really stick that much to the rice krispies but it had a good balance I felt. I melted some chocolate and put it on top. I would suggest maybe drizzling the chocolate throughout the rice krispies first.
Mmm s'mores rice krispies. :]

4.22.2011

Dorie Greenspan's Jammers (slightly reimagined)

I have a weak spot for jam. And butter. And anything Dorie Greenspan. So when I first heard about Dorie's pop-up cookie bar and her delectable jammers, I knew that I'd either have to fly out to New York myself (unrealistic, but would be phenomenal) or attempt to make them as best as I could (not as awesome, but still great.) So, after many attempts at starting, many excuses for pausing, and a few deleted drafts, I introduce you to Dorie Inspired Jammers. Sorry it's late, but believe me, they are worth the wait. And thank you to Jen for opening up your place and snapping pictures and N for baking with me. Baking with friends is more fun, isn't it?

And before you think I am crazy for even thinking of flying all the way out to NY to get a taste of these, you should hear Dorie gush about them. "This is the cookie that came to me in a dream. These are the jammers. A sable - french butter short bread - with jam and streusal on top... Break it open... show the inside! I love the way the jam gets a shine and gets a little firm." And mmm. mmm. mmm. Boy, is she right. These things are BEAUTIFUL and DELICIOUS. Granted, I made a few changes and modifications, but I really hope that Dorie would approve anyways. :)

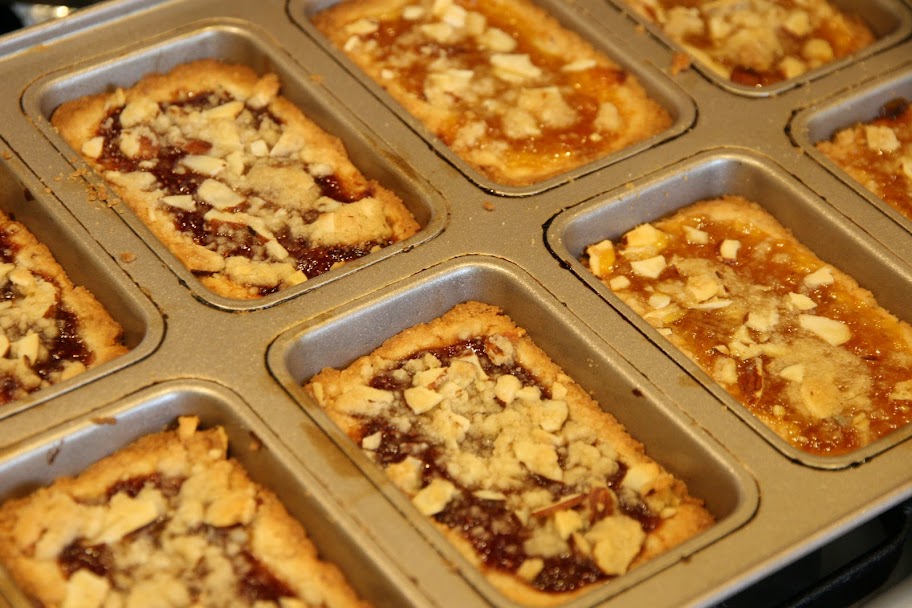
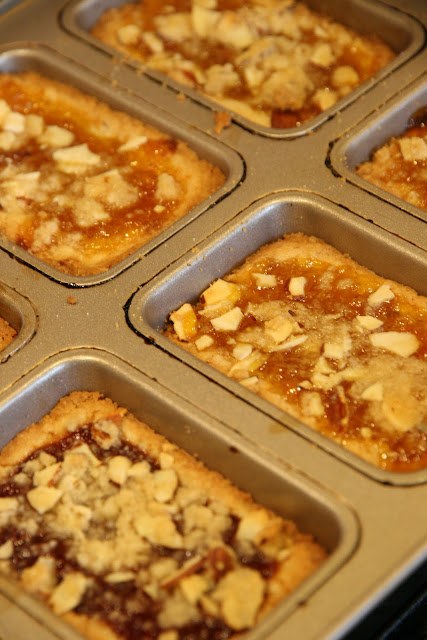
I call them Dorie inspired jammers for a number of reasons. First, we took the sable base, and we tweaked it to add almonds since N really, really loves almonds. We also used different jam (blenheim apricot and rose strawberry) in part because they are local and I like to support my local community, but more so because as I've mentioned before, this apricot jam is the most delicious jam I have ever had in my life. Since I couldn't find Dories streusal recipe anywhere, we took this one, and made it slightly different and added almonds of course. And lastly, since we didn't have ring mold or a whoppie pie pan, we used my mini loaf pan, which worked wonderfully by baking a lovely crispy edge for the cookie. (I've also found that if you don't have any of these, these cookies taste just as great baked on a flat cookie sheet, though the base will be much thinner.)

And the result? Exceptionally perfect, baked jam atop a wonderfully almond crumbly cookie that melts in your mouth with an innovative stresual topping. And what's really great about these cookies is that they are so versatile! You can put virtually anything on them like jam or nutella, and you can also do infinite things with the base as well, add coconut, lemon or lime zest, or wherever your mind might take you! I cannot stress enough how wonderful these cookies are, and I encourage you to make them, right now! Sadly, mine are already gone (even the second batch of batter), so if you make some, please holler!

And Dorie: If you ever come across this post, please know, I am a huge, huge fan. I love how you are so masterful at your craft, but you still choose to make it so accessible to even the lowliest of us cooks. Thank you for your fabulous personality, work and love. :)

Dorie Inspired Jammers by J and N

* In order to make these, they are best if you can use a pan with sides so that the cookie is forced to retain shape rather than flatten. Dorie used ring molds. L+D used a whoppie pie pan. I used a mini loaf pan. And I imagine you can use a number of other pans with the same outcome (albeit different shapes and sizes) - muffin pan, cupcake pan, souffle cups, individual-sized tart tins, etc. If you don't have any of these, you can also just use a regular old cookie sheet. Even though the base of the jammers will flatten and the sides won't crisp up, they are still delicious this way too!

Sable Cookies (Via NYTimes)

  • 1 stick and 6 tablespoons butter, softened at room temp.
  • 1/2 cup sugar
  • 1/4 cup powdered sugar
  • 1/2 teaspoon sea salt or salt
  • 2 large egg yolks
  • 1/2 teaspoon vanilla extract
  • 1/2 teaspoon almond extract
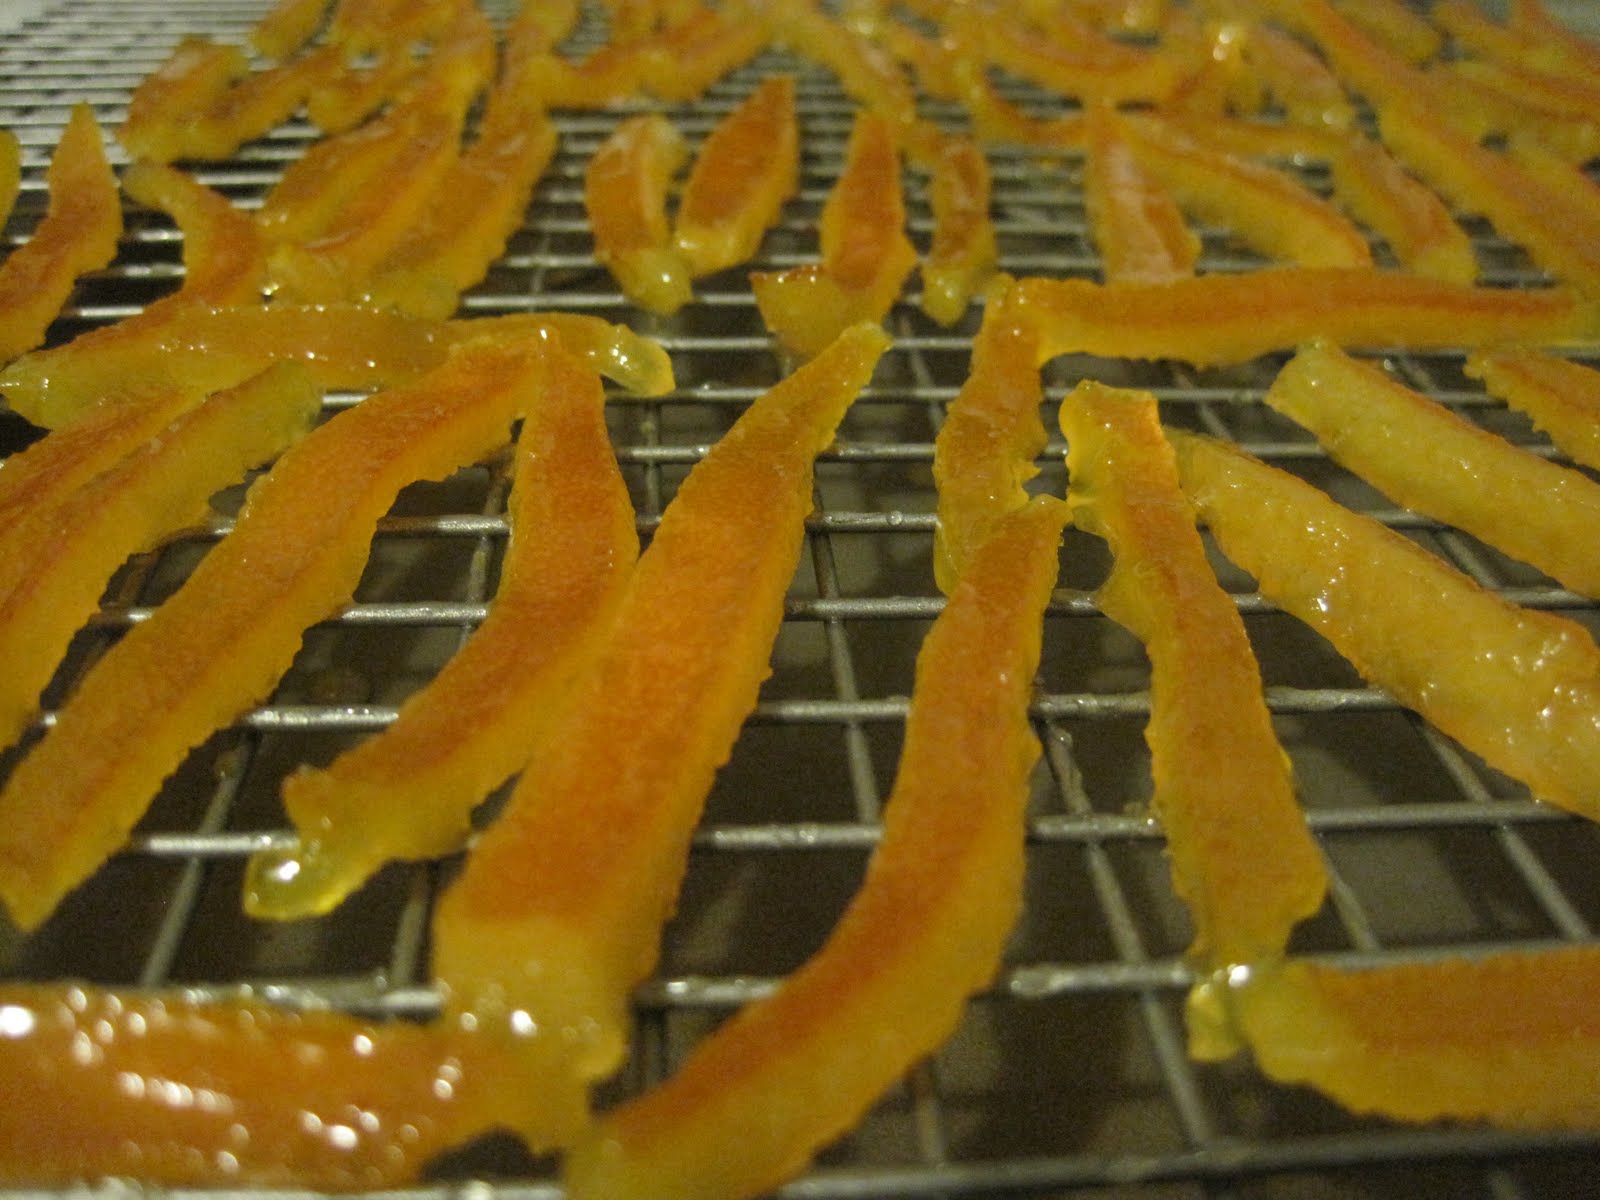
  • 1/2 cup ground almonds (I measured 1/2 cup toasted almonds the grounded it in a food processor)
  • 2 cups all purpose flour

Jam: use whatever jar of jam you prefer!

Streusal Topping (L+D Dorie's Jammers w/ a few changes)

  • 1/2 cup flour
  • 1/4 light brown sugar
  • 2 tablespoons sugar
  • 1/4 teaspoon salt
  • pinch of cinnamon
  • 1/4 slice almonds
  • 4 tablespoons butter (cubed)

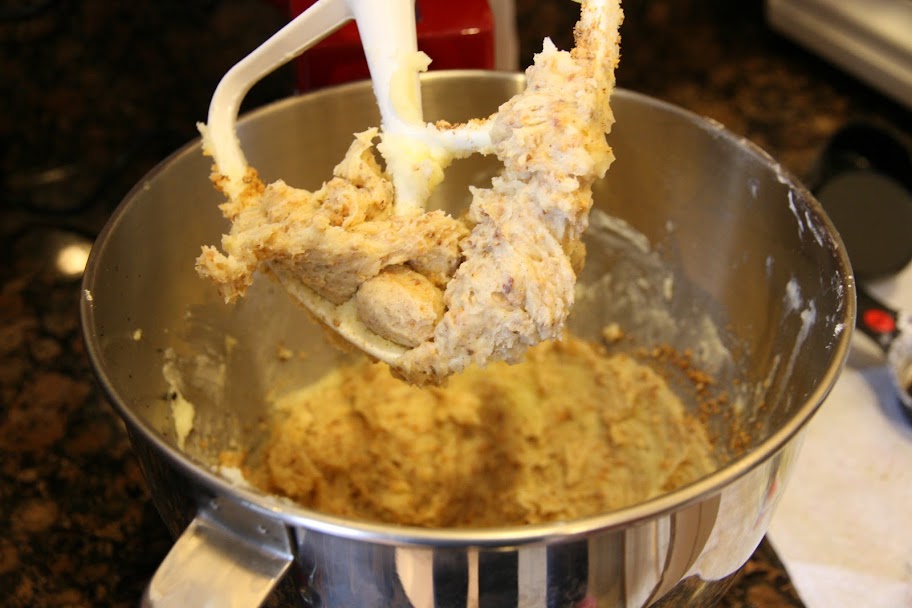
Working in a mixer fitted with a paddle attachment, beat the butter at medium speed until it is smooth and very creamy. Add the sugars and salt and continue to beat until smooth and velvety, not fluffy and airy, about 1 minute. Reduce the mixer speed to low and beat in 2 egg yolks, vanilla extract, almond extract and ground almonds, again beating until well blended.

Turn off the mixer, pour in the flour, drape a kitchen towel over the mixer and pulse the mixer about 5 times at low speed for 1 or 2 seconds each time. Take a peek; if there is still a lot of flour on the surface of the dough, pulse a couple of more times; if not, remove the towel. Continuing at low speed, stir for about 30 seconds more, just until the flour disappears into the dough and the dough looks uniformly moist. If you still have some flour on the bottom of the bowl, stop mixing and use a rubber spatula to work the rest of it into the dough. (The dough will not come together in a ball -- and it shouldn't. You want to work the dough as little as possible. What you're aiming for is a soft, moist, clumpy dough. When pinched, it should feel a little like Play-Doh.)

Scrape the dough onto a work surface, gather it into a ball. Form the dough into a flattened disk. Wrap the disk well and chill them for at least 2 hours. The dough may be kept in the refrigerator for up to 3 days or frozen for up to 2 months.

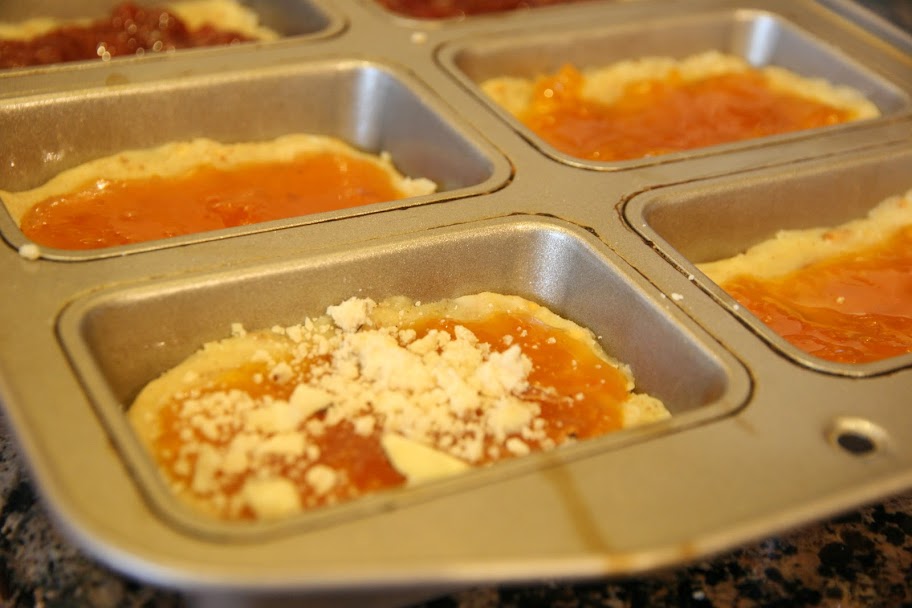
When ready to bake, center a rack in the oven and preheat the oven to 350 degrees and grease whatever pan you are using to make your jammer. Line your pan with parchment paper or grease really well. If you are using a loaf, muffin, or something similar pan, take bits of the chilled dough and press it into the base of whatever pan you are using. Try to make sure that you are putting about the same amount of dough into each individual pan so that the cookies will all bake evenly. As you are doing this, also make sure to build the sides of your cookie higher than the middle so that the jam has somewhere to go and won't get all over your lovely pan. If you are using a cookie sheet, ring molds, etc. Roll out your dough so that it is about 1/2 inch tall. Then cut whatever shapes you'd like your cookies to be. Create an indentation in the middle of your cookies so that the edges are slightly higher than th middle of the cookie. (As a reference, I used about 3/4 of a batch of dough for 8 mini-loaf sized cookies. According to Dorie's recipe, half a batch of dough should make about 20 small-ish cookies.

Streusal Topping

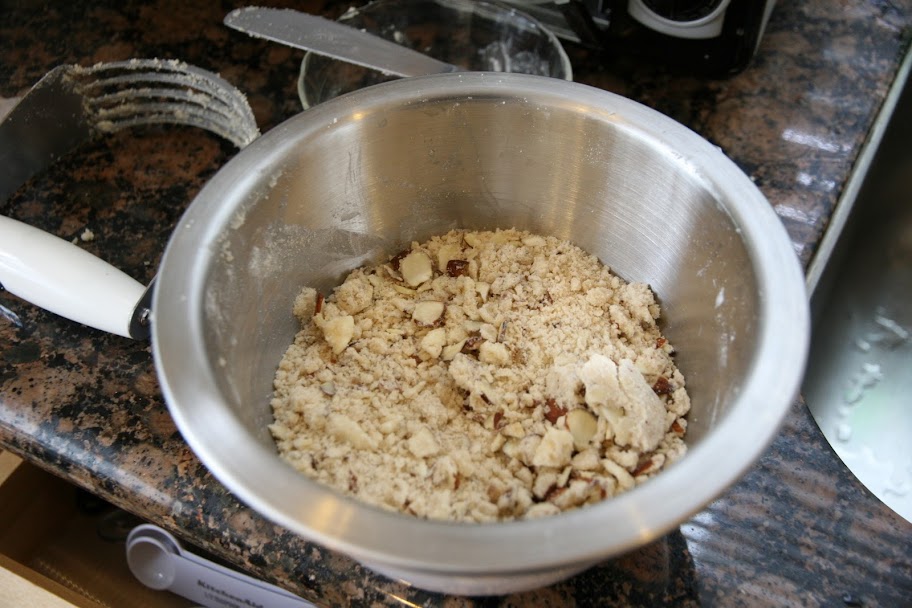
While the dough is being cooled, make your stresual topping! Pour flour, brown sugar, suga, salt and cinnamon into a small bowl and mix with a fork. Add in the almonds and butter. Using a pastry cutter, two knives or a fork, blend in the butter with the dry mixture to form a stresual topping. The mixture will be crumbly and will still have bits of butter in tact.

Assembly

Once your cookies are rolle/pressed out, spoon your choice of jam into the center of the cookie. Spread it out so that the jam reaches toyour raised edges; this amount really depends on the size of your cookie. For my mini-loaf pan, I used about 1 1/2 - 2 tablespoons for each cookie. Then sprinkle however much streusal topping you'd like over the top. Bake for 17 to 20 minutes or until the edges of the cookies are lightly brown. Rotate the baking sheet at the halfway point. Let the cookies rest 1 or 2 minutes before carefully lifting them onto a cooling rack with a wide metal spatula.

4.06.2011

birthday bliss

More to come (cupcakes, tapas, and filet mignon, to be exact. Oh my! Thank you Thomas for this picture).