Showing posts with label chocolate. Show all posts

5.31.2011

chocolate covered orange peel

My mom really likes these. Not just oranges...but chocolate covered oranges. Everywhere we go, if she sees the chocolate covered orange peels, she'll want to buy it, except that it's supersuper expensive for some orange peels (which people throw away) and chocolate! Ridiculousness. Though I'm sure theirs tastes super delicious and yummy...but how hard can they be?

I decided to make them for my mom when she came to visit me and m. It's not hard at all, just time consuming. You have the cut the peel first, then boil it in water. Not just once, but three times!
I peeled three oranges...it was a lot...
I think this is to boil away the bitterness of the pith, if there's much left. Then create the sugar and water mixture and boil the peels in that until they are translucent. This took me around 45 minutes. Then you have to let them dry for as long as you can.
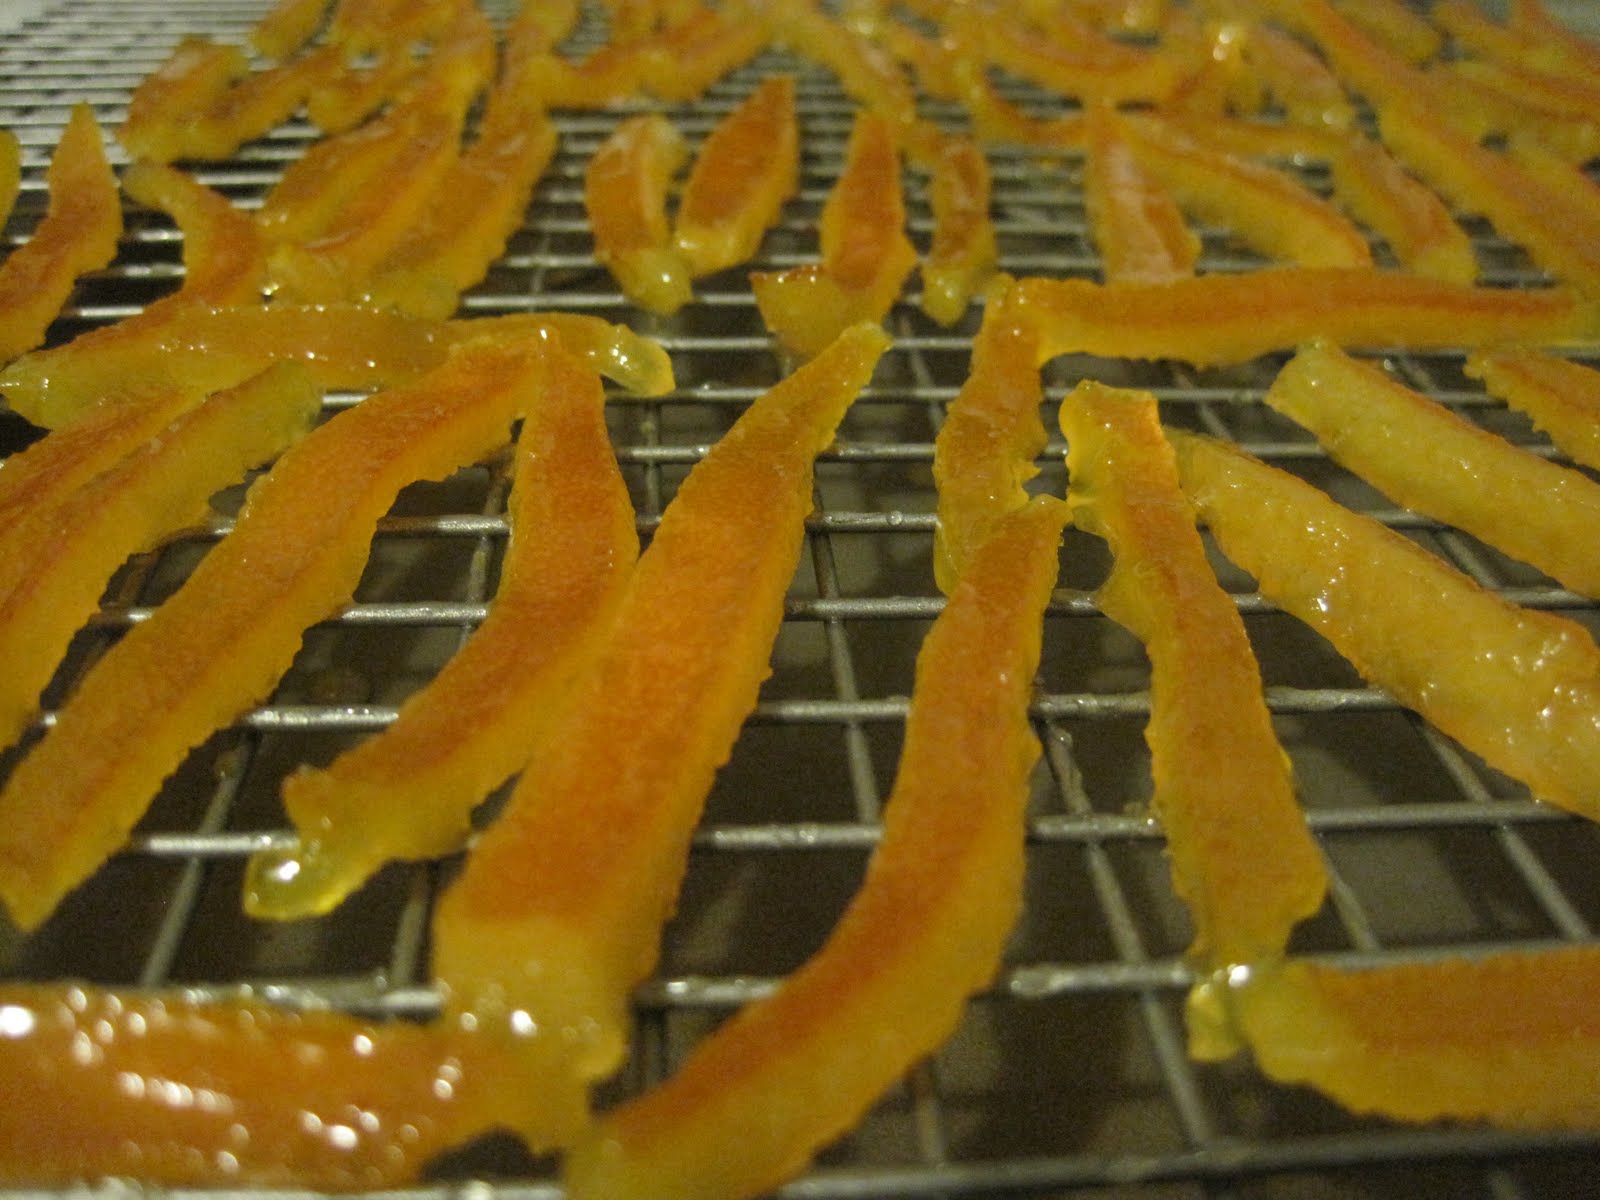
I think I could've done a better job at leaving the excess sugar off...
I dried them for 2 days. They kinda don't look right...but it was alright :]

Then dipping the peel into chocolate, what a pain. I think I'm not very good at it, or just didn't find a good way of doing it. Use good chocolate, I think it makes a difference.
But they turned out good!
Here's the recipe:

Candied Orange (Citrus) Peel
adapted from userealbutter

4 oranges, peel of (or any thick skinned orange)
3 cups sugar
1 cup water

1 cup sugar for rolling
or
8 oz chocolate for dipping

You can harvest the peel in many ways. Here are two I recommend: 1) Cut the oranges in half and juice them. Cut each half in half again and take a spoon to scrape the pulp out, leaving a clean pith. 2) Lop off the top and bottom of each orange (think of removing the polar caps where the stem and opposite end are) just to the fruit. Score the orange peel like lines of longitude every 60 degrees. Peel the orange and clean the inside of the peel with a spoon.

Cut peel into 1/4 inch strips. Place peels in a large saucepan and cover with cold water. Heat on high until water comes to a boil. Pour off the water. Repeat twice more. Combine sugar and water in the saucepan and bring to boil over high heat until temperature reaches 230F. Add peel and reduce heat to simmer. Simmer until peels are translucent (30 minutes or longer). Remove peels from syrup and roll in sugar if desired, and set on rack to dry for 4-5 hours. Once the peel is dry, you can dip in tempered dark chocolate – shake off excess, and place on foil, wax paper, or baking sheet to dry. Store in a tupperware, or if not chocolate dipped, store in sugar or as is.

5.01.2011

more s'mores madness!

I went through a s'mores craze. All I wanted to eat was s'mores and I wanted to make things with a s'mores theme. Needless to say, I'm over it and I'm satisfied.

There are always those days that you want s'mores, except you're not outdoors camping so it'll never be the same! SO what do you do?
Yeppp, we improvised. That is our indoor campfire. Actually its pretty dangerous so use with caution!
Just like any ordinary s'mores, we have our graham cracker, chocolate, and our perfectly heated and toasted marshmallow.
Mush it together and voila! You have s'mores. :] Yummm
So with leftover marshmallows, chocolate and graham crackers...I had to make something else! I love love, absolutely love rice krispies. So I thought, we not make s'mores rice krispies.
Very simply, I made rice krispies as I normally would but I made a graham cracker crust by crushing the graham crackers and a little bit of melted butter. So it kinda didn't turn out as well, but still pretty good. The graham cracker didn't really stick that much to the rice krispies but it had a good balance I felt. I melted some chocolate and put it on top. I would suggest maybe drizzling the chocolate throughout the rice krispies first.
Mmm s'mores rice krispies. :]

1.24.2011

chocolate fallen soufflé cupcakes

These are yummy. That's it. I've made them a couple of times for birthdays and gifts and they are very easy and do-able.

I wish I could say that I can make soufflés but I can't. This is my closest attempt...and they're fallen... These are definitely a go-to recipe when you don't know what to make!

These are step-by-step pictures on the process and it may seem time-consuming and mean lots of equipment to wash...it is. But I am the master of trying to lessen the amount of dishes to wash and use the easiest, most time-saving ways. So if I'm willing to do this, then I'm sure everyone will be able to.

First you have to melt the chocolate, butter, and espresso powder on the stove. Keep an eye on this and keep stirring or your chocolate will easily burn. Once chocolate is all melted, take it off the stove and set it aside to cool down.
Next, whisk egg whites until soft peaks form. I used a hand-held mixer because I don't have a stand mixer. Using electric mixers is very useful and time-saving. I think my arm would break off if I didn't have one. Add in some of the sugar and all the salt until medium firm peaks form.
It's not too bad. Be careful not to overmix which I always end up doing because it's so fast with the electric mixer.

Well for the next step, I forgot to take pictures...but it's basically in a separate bowl, mix the egg yolks and sugar together until thick and pale (used an electric mixer, it's very fast!). Then add the cooled down chocolate and vanilla extract into the mixture.
Then gently fold the egg whites into the chocolate mixture using a spatula.
It doesn't have to be perfect, but try to not deflate the egg whites. And that's it! So I used a pot for melting, a bowl for egg whites, a bowl for egg yolk mixture, one beater (which I beat the egg whites first so I didn't have to wash and clean for the egg yolk mixture), and spatula. Nothing to it!
Line up your cupcake tin with liners. This is very important to have liners because the cupcakes will not come out even if you butter your tin generously. They're too delicate.
Fill them up about 3/4ths the way. I had a little more leftover from the 12, so I filled up the rest in a ramekin.
Bake and voila! First they're slightly puffy, but then they fall...hence the name fallen soufflé.

Here's the recipe! Guess where I got it from? Of course! Smitten kitchen! She adds a white chocolate mint cream, but I didn't. If you eat it with vanilla ice cream...omggg its super yummy especially when the cupcake is warm. My step to step is slightly different, but results should be the same!

Ingredients:
6 ounces (170 grams) bittersweet or semisweet chocolate, chopped (I used semisweet)
6 tablespoons (3/4 stick) (86 grams) unsalted butter, cut into pieces
Heaping 1/4 teaspoon (1 gram) espresso or instant coffee powder
3 large eggs, separated
6 tablespoons (97 grams) sugar, divided
1/4 teaspoon salt
1 teaspoon vanilla extract
Directions:

Preheat oven to 350°F. Line 9 standard-size (3-ounce) muffin cups with paper liners. Stir chocolate, butter and espresso powder together in heavy medium saucepan over low heat mostly melted, then remove from the heat and whisk until it is fully melted and smooth. (I like to put the butter underneath the chocolate in the pan, so that it protects the chocolate from the direct heat.) Cool to lukewarm, stirring occasionally.

Using electric mixer (a hand mixer, rather than a stand mixer, actually works best here because the volumes are so small) beat egg yolks and 3 tablespoons sugar in medium bowl until mixture is very thick and pale, about 2 minutes. Briefly beat lukewarm chocolate mixture, then vanilla extract, into yolk mixture. Using clean dry beaters, beat egg whites in another medium bowl until soft peaks form. Gradually add remaining 3 tablespoons sugar and all of the salt, beating until medium-firm peaks form. Fold whites into chocolate mixture in 3 additions. Divide batter among prepared cups, filling each three-fourths of the way.

Bake cakes until tops are puffed and dry to the touch (some may crack, embrace it) and a tester inserted into the centers comes out with some moist crumbs attached, about 15 to 20 minutes. Cool in pan on a cooling rack, where the cupcakes will almost immediately start to fall.

Chocolate fallen soufflé cupackes courtesy of smittenkitchen

3.18.2010

bacon bar

This girl, like everyone else who knows me, knows that I love bacon. It's really too bad that I have high cholesterol--not that it stops me from eating bacon (even when it's tempura'd! N will tell you all about that experience).

So imagine my delight when she hands this to me one day:


Is that what you think it is? Why yes, it's a bacon chocolate bar.

Vosges concocts all sorts of exotic chocolate bars, specializing in self-titled "haut-chocolate." (There was one chocolate bar that boasted wasabi that we considered buying for this guy, but we thought better of it.)

The bacon bar works only because people like savory and sweet. I mean, salted caramels (salted caramel ice cream! mmmm), sea salt and chocolate and a dash of oil on bread, this is what's in, in the sweets world. Otherwise, the bacon bar doesn't really have much bacon taste...it's just salty. And maybe that's for the better.

We were excited to see an actual Vosges store in Cesar's Palace at Vegas, and we walked in and sampled caramel barks and truffles--all very good. They even had ice cream! We weren't buying anything, so I felt bad about sampling things, but if you get the chance, definitely stop by and treat yourself to their chocolate.

They also keep a really interesting blog called Peace Love and Chocolate, where they put chocolate on all sorts of things!

2.23.2010

happiness in the form of cakes

i first heard pchung was going to propose to jen on wednesday and i was super super excited and super super happy and every positive feeling you can possibly feel. in my happy state i decided i just had to bake something for them. dude serious dilemma. but i finally settled on double chocolate cake from smitten kitchen. i've wanted to bake a cake for a long long time, but was always way too lazy. but since this was super super special, i had to do it.

i spent three days on this cake because i didn't have 5 + hours to spare in a single day. friday afternoon i did the raspberry filling. my bad at not documenting each step but again i was lazy. it was really easy. food processors=easier life. straining out the seeds was kinda a hassle but it was fine. i fridged it until i needed it which wasn't until two days later. i would suggest not making this first. when i took it out of the fridge to spread on the cake, it became solidified in a almost gelly consistency. i had to bring it to room temperature and mix it like crazy but it turned out fine. make this the day of, it'll probably be better.

the next day i made the cake. it was easy, except my pans were different sizes and i had SO MUCH batter that i used three cake pans. and it finished baking in like 40 minutes. good thing i checked cause it smelled done. its good to make this the day before since you need to wait for it to cool down.

sunday morning, i made the frosting and halved the recipe. it was surprisingly easy. i cooled it in an ice bath and assembled the cake. i had to shave off the volcano like dome to make t it looked really really ugly so i decorated it was raspberries. the frosting got hard so the raspberries wouldn't stick so i used a dab of icing as glue.


yay! i actually didn't get to see it eaten but i did eat the scrapes and it tasted pretty good. :) it wasn't as hard as i expected! its very do-able and a good recipe!
happily engaged :) and no, not cause of the cake (stolen picture from jen)

okayy, so there was another cake i made for melody and jr's birthday! i was super excited for their birthday too cause they're super cool and awesome! i decided to bake cranberry vanilla coffeecake since i found fresh cranberries! it was cranberry season! i love surprises :)

the ugliness because i ran out of powdered sugar. it looks diseased...

ahh, much better!

the recipe calls for vanilla bean which is i did not have because i am cheap. so i added vanilla extract to the cranberry mixture and the cake itself. i'm sure it would taste much more delicious with the vanilla sugar. a very do-able recipe!

recipe courtesy of epicurious

- n