3.05.2011

Challenge Accepted: Cornbread Broccoli Surprise!


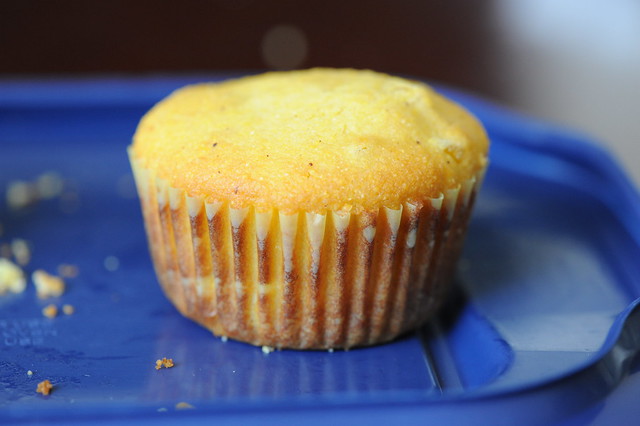
This looks like your everyday corn muffin, right? You can even see the little bits of corn poking out at you. Aren't they cute?

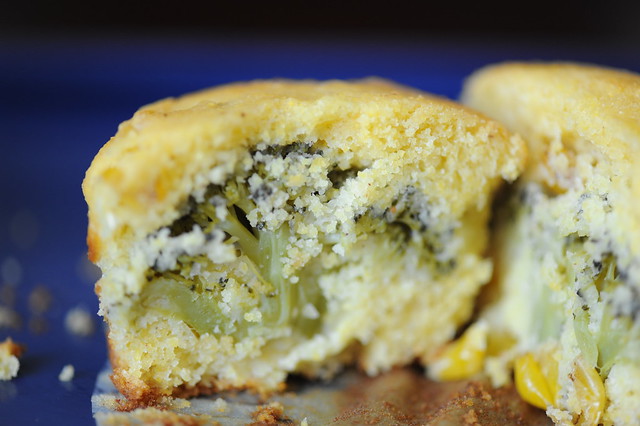
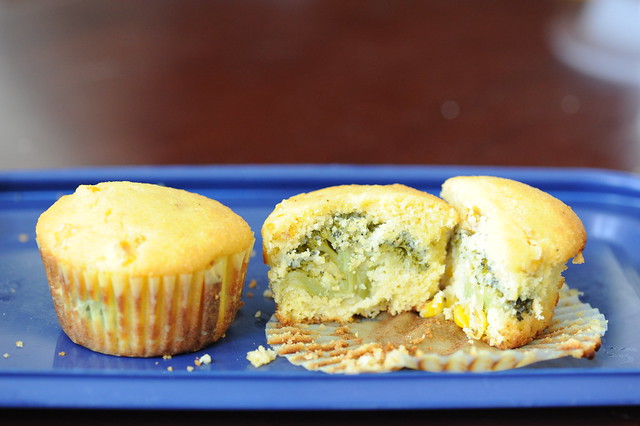
But aha! That is where I have tricked you! First of all, this is no ordinary corn muffin. It is the most delicious, perfect corn muffin I've ever had. And second, inside each of these already glorious corn muffin gems, is a giant piece of broccoli waiting to give you the extra nutrients you need, or at least give me the chance to win a little friendly competition. And they look awesome - like little trees surrounded by the sun.


It all started with a friendly little evite for small group. The challenge? Cook something with broccoli, and the winner will have their first pick of any favor offered by the group. Now, I have some formidable cooks in my small group, so I knew I would have to go all out to win.

After a lot of thinking, I finally decided on making some sort of dessert, but what could possibly make broccoli taste like a dessert. It's not like you can just dip it in chocolate and call it a day. Then, like a beacon of hope, I found my inspiration: corn bread - savory enough to still match with broccoli, but able to be made sweet enough to still be dessert-like. Perfect!

Assembly is so easy! Put a little corn muffin batter at the bottom, and place a broccoli stalk upright in the middle.
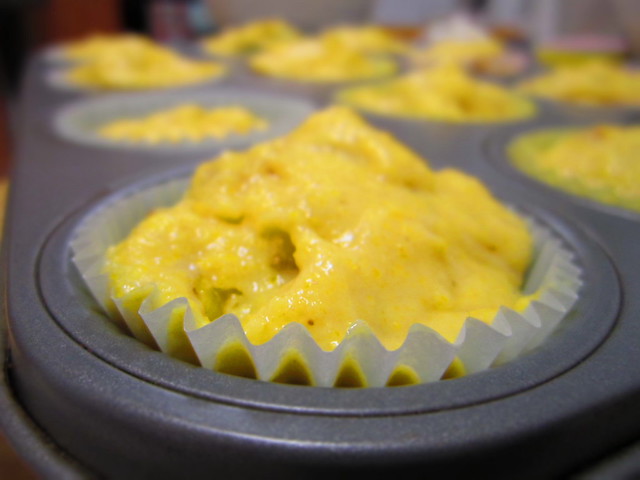
Pour corn bread batter over your broccoli so that it completely hides any sign of the broccoli. Then, bake.

With or without the broccoli, these corn muffins are delicious. They are just the right touch of crumbly, while still moist and the addition of corn adds a great extra texture. It can be easily adjusted to be either sweet or savory. Personally, I also thought the broccoli was a nice addition. I boiled it in honey water so the stalks would be soft and the broccoli itself would complement the sweetness of the corn muffin. I hope you enjoy!


Cornbread Broccoli Surprise!
Adapted from Dorie Greenspan's "Corniest Corn Muffins" - Baking from my Home to Yours

Makes 12 cornbread muffins
  • 12 Small bunches of broccoli
  • 1/2 cup honey
  • 1 cup all-purpose flour
  • 1 cup yellow cornmeal
  • 6 tbls sugar
  • 2 1/2 teaspoons baking powder
  • 1/4 teaspoon baking soda
  • 1/2 teaspoon salt
  • 1 cup buttermilk
  • 3 tbls melted, browned butter
  • 3 tbls oil
  • 1 egg
  • 1 egg yolk
  • 1 cup corn kernels - I'd use fresh... otherwise, maybe don't even bother.
Bring 2 cups of water and 1/4 cup of honey to a boil. Dump in your broccoli and boil until tender and broccoli takes on a hint of honey, about 6 minutes. Once done, thoroughly pat dry so that the broccoli is not moist and put aside.

Preheat oven to 400°F, and place rack in the middle of oven. Prepare muffin tins with either paper muffin cups or by greasing the pan.

In a large mixing bowl, mix together the flour, cornmeal, sugar, baking powder, baking soda and salt. Then, in a pyrex measuring cup (PS: I really love pyrex! So simple, versatile and easy to use!) or something that is easy to pour out of, whisk together the buttermilk, browned butter, oil, egg, egg yolk, and remaining 1/4 cup of honey until well combined. Once mixed, pour the liquids into the dry ingredients while simultaneously stirring. Stir quickly, until just combined; the batter will be lumpy and relatively thick. (Be careful not to over mix your wet and dry ingredients as the corn muffins will become very tough and dry if stirred too much.) Finally, gently fold in your corn kernels.

To assemble, scoop a large spoonful of batter into the bottoms of each of your muffin cups so that batter fills about 1/4 of an inch of the muffin cup. Then, firmly place a broccoli stalk upright into each of the muffin cups. The broccoli should stand on its own without leaning toward a side of the muffin cup. Pour the rest of the batter over the broccoli so that each stalk is completely covered. Be careful to make sure that the batter completely surrounds the broccoli on all sides (including under the crown of the broccoli) so that your muffins bake in full rather than just tops and bottoms. (PS: Your muffins will likely look lumpy or messy before they are baked, but I assure they bake beautifully smooth and fluffy.)

Bake for for 15 - 18 minutes or until tops of muffins are golden and an inserted toothpick comes out clean. Cool muffins for at least five minutes before removing from molds.

Cut in half to reveal the surprise, serve warm with honey butter, and enjoy!

Thanks Thomas for some of the photos. :D

3.03.2011

burma superstar

For jwoo's birthday, me, m, j, jen and peter took him to burma superstar. It was all our first times except for m's. Maybe m and j can add to this review... So we ordered 6 dishes and it was pretty good. Not sure if it's my type of food in terms of spices and all, but pretty good.
Samusa Soup. This was yummy, but I wasn't really sure what I was eating and drinking. Hahaha.
Tea leaf salad. This is the thing that they are famous for and everyone raves about it. I thought it was alright. I liked the nuttyness and that you can actually see the components that you were eating. I also liked how they mix it in front of you. It made me think they were cooler.
Rainbow salad. I liked this salad better, based on taste and I don't know...but yes, more fresh tasting rather than heavy on tea leaves.
Pork curry with potatoes. This was good. I can't really remember actually...the pork was soft and potatoes cooked through...
Salmon curry with pumpkin. This was okay too. I liked the pumpkin in it.
Beef kebat. This was my favorite. It was just enough spicy and cooked really well.

I'd say, it's a good experience, but I don't think this is something that I crave and think about going to and eating at. Worth going to though just to try.

Burma Superstar
4721 Telegraph Ave
(between 47th St & 48th St)
Oakland, CA 94609
(510) 652-2900

cream puffs

Cream puffs. I really like these and actually, they're kinda scary to make. But before I talk about that, let me introduce you to something...
Meet my first cookbook. Is it beautiful?! It's from Jess for my graduation present. I'm really excited to bake from this book, and this is my first!
Profiteroles is just the fancier way of saying cream puff. Maybe there's a difference, but to me, it's all the same. So I followed the recipe for the puff itself, but did not use the filling or the sauce.
After making the batter on top of the stove, I piped out about 1-inch mounds of dough. With a moistened fingers, I smoothed the tops. Then I baked them!
After they finished baking, I had to slit a hole into each of them and put it back into the oven, with the oven off and the door open, so the puffs would remain puffed and not deflate.
Cooled and ready to be filled! I made my custard which is the same recipe I use for fruit tarts! Very easy.
That's the tip I used, it's just so much easier and made it so that I didn't have to cut the puff in half to fill it.
A neat trick to fill the pastry bag is to put it in a cup and fold the sides of the pastry bag down. Then fill the pastry bag with your filling and that's it! So easy and makes your hands free.
Pipe it through the hole you punctured in it earlier. And there you have it, your cream puff!
Cream puff recipe (I halved the recipe and made about 26 cream puffs):
makes 4 dozen

Ingredients:
1 cup water
1/2 cup unsalted butter (1 stick)
1 cup unbleached all purpose flour
1/4 tsp salt
4 eggs

Directions:
Bring 1 cup water and 1 stick butter to boil in a medium saucepan over medium-high heat, stirring until butter is melted. Turn heat to low, add flour and salt all at once. Stir vigorously until mixture is smooth and dough pulls away from the edges and forms a ball, and leaves a thin film on pan bottom (about 2 minutes). Transfer to large bowl. Using a handheld mixer (I did it by hand! My workout), add eggs one at a time, blending well after each addition. Cover dough loosely with plastic wrap. Let dough stand and cool for about an hour.

Preheat over to 425°F. Lightly butter (I used parchment paper) 2 large rimmed baking sheets. Spoon dough into pastry bag fitted with 1/2 inch plain tip. Pipe 1-inch rounds on prepared baking sheets, spacing 2 inches apart (mine was more like 1-inch). Using moistened fingertips, smooth tops.

Bake puffs until golden brown and puffed, about 23 minutes. Remove from oven and turn off the heat. Pierce side of each puff with tip of small knife. Return the puffs to hot oven; let stand for 10 minutes with door ajar. Remove from oven and cool completely.

*Can be made one day ahead. Store in airtight container.

Pastry cream - kind of like a vanilla custard :]
You can find the recipe here at the fruit tart post. I halved this as well, but ran out of filling, so maybe be less generous or make the entire amount and be more generous (I'd go for the latter option).

Fill the pastry cream into pastry bag with 1/4 inch plain tip (I used star, I don't think it matters). Insert tip into cut on each puff and pipe in filling.

*Can be made 8 hours in advance. Cover loosely with plastic wrap and refrigerate.

half & half teahouse

I heart boba. Like really like it. And I'm a boba snob, as people say it...but I'm not that bad!!!

I first tried Half & Half Tea House in San Gabriel during Hunt and Eileen's wedding. I am a die hard Ten Ren's fan, but this place was comparable! I've always wanted to go back but it's soooo far from my house and since there's a Ten Ren's right next to my house, there was no reason to venture out. BUT, they opened a Half & Half Tea Express in Rowland Heights! So I went and tried.
Look at that, it's humongous. Actually it was different than what I remembered but I think they're using the trend in Taiwan and their 胖胖杯. It is quite fat and this was the smaller size.
Comparison in size to the drink from Phoenix, it's ridiculous. I always get green milk tea with boba. It's good, not too sweet, tastes of tea and the boba was the right q consistency. Go check it out!

17575 Colima Rd
Ste C
City of Industry, CA 91748

3.02.2011

pulled pork tacos w/ guacamole and mango salsa

Pulled pork tacos. I'm not sure where I got an itch to make this, but I did. And it was easy, especially with a slow cooker (which I borrowed from tammy). I had more pictures but jwoo did not give them to me, so you'll have to settle with my ugly looking pictures.
I bought this humongo 10 pound bone-in pork shoulder. Way too big to fit into the slow cooker (it was a 6 quart) so me and jwoo went through this whole ordeal with chopping it in half. In the process, we de-skinned and de-fatted the pork (leave some fat because it tastes good). After, I made a mixture of cumin, brown sugar, salt, black pepper, paprika, oregano, and cayenne pepper and let the pork marinate overnight.

The next day, all I did was line the bottom of the slow cooker with quartered onions, lay the pork shoulder on top, cover the pork halfway with red wine, water, and salt mixture. Turn on the slow cooker, put it on low, 8 hours and leave it!
This is what it looked like after the 8 hours. The cool thing about the slow cooker is that after the time was up, the setting was turned to keep warm, so the pork was kept warm. It was beautiful. The meat was falling of the bone and it was nice and tender.
To shred it, we used two forks and just went at the pork.
Our final product. Or just the pork....
I served it with guacamole and mango salsa, which are so easy to make, cilantro, cabbage, and onions and mushrooms.
This picture is really sucky, but that's our taco!

So I didn't really follow a recipe, I looked at a lot of different recipes and created my own, so measurement wise...I wouldn't say it is super accurate.

Ingredients:
1 5-6 pound bone-in pork shoulder
Spice rub (recipe below)
2 cups red wine (can use red wine vinegar)
half a chopped onion
half a cabbage - shredded
approx. 50 torillas (corn or flour, I personally like flour better)
Guacamole (recipe below; optional)
Mango salsa (recipe below; optional)

Directions:
Take pork (this is de-skinned and de-fatted, unless you want to keep it) and massage spice rub into pork and cover in plastic wrap or in a zip lock bag. Refrigerate and leave to marinate overnight.

The next morning, line the bottom of the slow cooker with onion. Place the pork on top of the onion layer. Pour in the red wine, if it does not cover up to half, then fill it up with water to halfway. Cover with the lid, and turn your slow cooker to low for 8 hours and THAT'S IT!

After 8 hours, take pork out of slow cooker. Let it rest so the juices can flow into the pork and keep the pork moist. Shred the pork using two forks and there you have it!

Spice rub:
1 tbsp black pepper
2 tbsp salt
3 tbsp cumin
1 tbsp oregano
2 tbsp paprika
1 tbsp cayenne pepper
1/4 cup brown sugar

Mix all of this together in bowl and set aside until ready to use.

Guacamole:
4 ripe avocados
half a lime juice
1/4 cup diced onion (can add more or less based on your preference; can use red onion)
1/4 cup diced tomato (can add more or less based on your preference)
1 tsp salt

Mash the avocados up (depending on how textured you like it). Add in lime juice (this I eyeballed entirely since it depends on your taste) and salt. Mix in onion and tomatoes. Taste it and adjust accordingly.

Mango salsa
1-2 ripe mangoes diced
1 lime
1 jalapeno diced (may remove seeds for less heat)
1/3 cup diced tomato (can add more or less based on your preference)
1/4 cup diced onion (can add more or less based on your preference, can use red onion)
2 tbsp chopped cilantro
1 tsp salt

Mix everything together. Taste and adjust accordingly.

These are easy to make and all depends on how you like your food!
To put the taco together, take the warmed tortilla and place as much pork you want, then add the extras: guacamole, mango salsa, and shredded cabbage.